Thursday, November 7, 2024

Component 3: Location Scout and Risk Assessment

This is the location scout and risk assessment for our production process (shooting locations). This report is created by Kalista and Rara. However, me and Chelsea helped in discussing the locations. This blogpost is written by me (Audrey).


 Click here to access the link directly to the file for our location scout and risk assessment.


---------------------------------------------------------------------------------------------------------------------------------------------------------------

๐‘บ๐’†๐’๐’‡ ๐‘น๐’†๐’‡๐’๐’†๐’„๐’•๐’Š๐’๐’:

My partners, Kalista and Rara, wrote the location scout and risk assessment. I did, however, contribute to the discussion about our filming locations. Overall, the risk assessment took little time because my friends and I were previously familiar with the places that we had chosen, so we knew their condition and situation.
Problem (P): However, the location scouting was particularly time-consuming as we needed to set a fixed setting for our music video. This was a problem for us as we hadn't been able to complete the full planning of the chronology and plot of the documentary which made us indecisive to figure out the mise-en-scenes, especially the setting. In addition, after we decided on a location, we had to make changes on d-day due to weather or circumstances which had been discussed on the risk assessment. This was handled professionally by me and my teammates.
However, location scouting was especially time-consuming because we needed to find a specific setting for our music video. This was an issue for us because we hadn't figure out the real life location for each scenes as we hadn't set a fixed setting for each clip, leaving us unsure about where to film according to the plotline of our music video. Furthermore, after deciding on a location, we had to make changes on the day of owing to weather or factors indicated in the risk assessment. This was handled professionally by me and my teammates.
Solution (S): Firstly, despite the fact that it took a long time to decide on the documentary's locations and plans, we were able to agree on one, and both Kalista and Rara completed the scouting and risk assessment efficiently. Finally, during the shoot, we made adjustments to the location, but there was no problem because we had already assessed a backup plan contained in the assessment above, which gave us an advantage because we were able to save time to discuss more possibilities because we had many options for shooting sites.

Component 3: Filming Schedule

This is the filming schedule for our production process (shooting). Chelsea had found a website and created the schedule for us, however we all had contributed to plan out dates, locations, props, and the timeline of the shooting. This blogpost is written by me (Audrey).


Here is the Jotform filming schedule.


---------------------------------------------------------------------------------------------------------------------------------------------------------------

๐‘บ๐’†๐’๐’‡ ๐‘น๐’†๐’‡๐’๐’†๐’„๐’•๐’Š๐’๐’:


Before production
How would a schedule help me?
A schedule would help me by organising what I need to do and when I need to do it. It allows me to keep on track so I do not fall behind by the submission date for the project. I may be able to avoid hectic and unexpected events that prevents the continuity of the production progress as this visual aid may help me identify important dates which distinguishes shooting time and other activities. As a group, we may be able to allocate our time spent for the production in order for us to be ensured to meet deadlines and avoid the stress of last-minute works. This also helps us to track our progress together as we share this schedule. It's also ensures a smoother communication between teammates as the schedule brings out a sense of clarity to help with the efficiency of our progress and completion of our project.
Is it realistic?
It should be realistic because we have tight personal schedule that inhibits more time being spent for us to work as a group for our documentary progress. The schedule must be followed accordingly to ensure our project is finished completely before submission date. It acts as a benchmark for us to finish and tick out our to-do list for every week, specifically for the shooting. Chelsea found this website (Jotform) which provides an easy layout for us to separate filming schedule, to-do lists, and list of production requirements which makes it easy for us to understand and comprehend our needs for the completion of this project. Hence, the importance of this schedule to be followed.
What problems might I face?
I think the biggest concern would be unexpected or sudden events, such as sick/absence for school lesson or unable to come to shooting days or even weather that prevents shooting to continue, this would hold back our production progress. This is very concerning which is really why I hope that we can all prevent from this circumstance to happen. And if it does as it is completely out of our hands, we hope for the best that we can manage and deal with the possible challenges.

After production
Problems:
The problem was that weather during filming were extreme and unpredictable so we couldn't guarantee if the shooting schedule is fixed or not. This may prevent our set timeline of production to be set back and we may not be able to finish a certain task or finish a certain scene on time before the whole music video is submitted.
Solution:
We had to change the dates if there are any weather issues which sets back the deadline.
Action plan:
Although we're not able to predict the challenges we're gonna face, it is important for us to keep up a good communication line between cast and crews to not give wrong information. We have to be able to create this schedule earlier so that we have more time to allocate and discuss our shooting dates with the other crews and cast.

Component 3: Richard Dyer's Theory of Stardom (Classwork)

Here is a summary of a theory we learnt at class today with our Media Studies teacher (Mr Nick). Itโ€™s about the Theory of Stardom by Richard Dyer which helped us build our starโ€™s image for our music video project. This blogpost is summarized by Rara and Audrey, however some of the celebrity research was done by Kalista and Chelsea as well.

Richard Dyerโ€™s theory suggests that celebrities are constructed by media institutions to attract their target audience and promote their product. The celebrities are portrayed as a mix of relatable qualities (to appear ordinary) and unique traits (to appeal to fans). It focuses on how the image of the star is vital to the marketing to build both commercial success and a deep emotional connection with fans.


Dyer believes that a duality of a โ€˜reelโ€™ and โ€˜realโ€™ persona of a celebrity keeps audiences engaged.

REEL persona: A curated version of themselves, designed to fit the expectations of an audience (such as Performances, Music videos, social media)

REAL persona: The authentic personality of the individualโ€”the way they are in their personal life, away from the public eye (such as Interviews, documentaries, behind-the-scenes footage)


Celebrities are appealing due to 5 main reasons: 

Love: We are fascinated with the love lives of the stars, can also feel a romantic affiliation with them

Ordinariness: We like to see them doing routine things, living normal lives just like our own

Success: We like the idea of overnight success, and failure before success. This appeals to our sense of fair play. (Why we like reality TV so much)

Consumption: We are fascinated by the huge material wealth brought by media success. Not just luxury homes and cars, but also strict dietary regimes set by expensive nutritionists, holidays etc.

Dream turned sour (downfall): The one thing we enjoy more than building up a celebrity is tearing one down. We like to exploit their misery.


Here are two celebrities that we researched and analyzed upon in detailed.


Component 3: Technical Element (Classwork)

Here is a summary on the analysis of technical elements such as camera angles and movements, mise-en-scene, sound, and edit in media texts and how connotations interpret meaning. This helped me to recall my knowledge and what we had been learning in class that can be applied to my music video production. This blogpost is written by me (Audrey).


There are four technical elements that we had learned namely:


1. CAMERA angles and movements


2. Mise-en-scene (MES)


3. SOUND


4. EDIT


CAMERA

Camera angles and movements are fundamental as it shapes interpretation on how the story is told and how the audience experiences it. Every shot taken builds up an implied meaning to direct the audienceโ€™s response (emotionally).


Camera Angles:

The positioning of the camera in relation to the main subject. How a camera captures a subject creates the overall portrayal and determines how audiences view the subject. 


  1. Long shot: Main subject is captured from a distance with their body fully visible. This shot is usually used to show action.

  2. Extreme long shot: Captures the subject from a greater distance to make the subject appear small. This shot is usually used to showcase insignificance or isolation of the subject due to the comparison between the small subject and vast setting. 

  3. Establishing shot: Shows the entirety of the setting which gives a context on the location to the audience. Frequently used in the beginning of a scene.

  4. Medium shot: Captures half of the subject (from the waist and upwards). This shot is commonly used for dialogues which shows and focuses on both facial expressions and body language. 

  5. Cowboy shot: Cowboy shots are usually taken on a lower angle and frames the subject from mid-thigh upwards, the subject usually appears bold and confident. This technique is usually used in action movie characters.

  6. Close up: Captures the entire face (head) of the subject emphasizing on the facial expressions and emotions of the subject. This detail creates an emotional connection for the audience.

  7. Extreme close up: Captures an even closer focus on a specific detail. The shot usually connotes that the subject is important as it creates tension.

  8. POV: Captures the events/scene in the eye of a subject and makes it appears as if the audience is experiencing what the subject is. Usually creates a bond between the audience and the character, evoking a sense of empathy.

  9. Over the shoulder: Captures a subject from over another characterโ€™s shoulders. This shot is frequently used for conversations.

  10. High angle: Camera is placed above the subject and is tilted downwards which makes the subject appear smaller and vulnerable. Connotations: Weak and vulnerable.

  11. Low angle: Positioned below the subject and is tilted upwards which makes the subject appear larger. Connotations: Power, dominance, and control.

  12. Dutch angle: Tilted sideways which creates a vertigo-like effect to create a sense of uneasiness from the audience.


Camera Movements:

Camerawork or motion to how the camera captures the audience and keeps the story flowing. This controls how audiences follow the plotline from how they reveal events and focuses on the subject.


Fixed

Camera remains static

Calm, peace, normal

Push in

Camera moves slowly toward subject

Brings the audience closer, more involved, getting more serious. 

Pull out

Camera moves slowly away from subject

Takes audience away from the action, leaving a character. Detaching from subject

Pan 

Side to side, camera fixed

Reveal information, mirrors natural head movement of the audience. 

Tilt

Up and down, camera fixed

Same as pan, just a different direction

Dolly 

Camera moves around freely

More immersive, we are moving inside the subjects world, we feel part of the action

Tracking

Camera moves around on tracks

Similar to dolly, but smoother. 

Crane

A tool that can move camera horizontally and vertically 

Reveals the epic size of the setting, landscape. 

Handheld

Camera is shakey

Very natural, immersive. High energy

Zoom

Zoom 

Brings audience closer to budget. Draws our attention to something. 


SOUND


Description

Effect

Diegetic sound

Sound that can be heard by the characters within the media text. 

Add a sense of realism. Reveal information to characters (and then audience)

Non diegetic sound

Sound that can only be heard by the audience.

Enhance meaning, create an emotional response in the audience

Trans diegetic sound 

Sound that transitions from one to the other. 

Creates a link between the audience and the world. More immersive


Description

Effect

Melodic

Positive and pleasing connotations

Enhances a positive scene. Create positive emotions in the audience.

Discordant

Harsh and unpleasant connotations. 

Enhance negative scenes.  Create suspense, tension, anxiety

Contrapuntal 

Has an opposite tone to the on-screen visuals. 

Adds deeper meaning to scenes. Insight into the character's thoughts. Maybe they seek pleasure in doing bad things. 


MISE-EN-SCENE:

Mise-en-scene refers to the arrangement and design of visual elements within a frame or a scene. 


EDIT:


---------------------------------------------------------------------------------------------------------------------------------------------------------------

๐‘บ๐’†๐’๐’‡ ๐‘น๐’†๐’‡๐’๐’†๐’„๐’•๐’Š๐’๐’:

This classwork had refreshen my memory regarding technical elements and had helped me understand more on terminologies. I am able to recap this whole classwork as my Media Studies teacher had provided a presentation I can reread. This classwork would help me when applying for the music videos technical elements.

Component 3: Screen Test

Here is the screen test for our music video project as we find our star for our music video. Here is a video of our class's group audition. This blog post is written by me (Audrey).


Here is the video for our whole Media Class students audition. We did this screen test as a class where we all lipsync to the song "Don't Stop Me Now" by Queen. We had chosen this song as a class because most of us were familiar with the lyrics already (however it was still displayed on screen). The genre of this song (rock) does not match with the genre of our choice (pop) but the song was upbeat so it still works.

Here is the link: https://youtu.be/LL4o9gvDgdw

From the audition tape, we didn't really have any picks yet because there aren't anyone in certain that fits to our star's persona that we are looking for. Although, it was still beneficial for us to do it.

Here is what Rara what wrote.

Brief overview of screen test 
According to studiobinder.com, a screen test is a filmed audition in which an actor demonstrates their suitability for a role, in this case, a music video. Generally, actors are given lines of the lyrics to lip sync and perform on camera. Other than that, screen tests are also utilised to see how clothing, makeup, colours and other accessories may appear on an already casted actor. 

Benefits of using a screen test includes:
-> To see how actor performs on camera
-> Testing wardrobe, makeup, accessories on the actor to see if they fit the visual style 
-> Determining chemistry between 2 actors
-> Having audition footage to help make decisions later 

Advantages: 
- As a class we were able to get around 20 people or more to do this screen test, which allowed me to fully comprehend what I was looking for, for my artist
- Our teacher was able to encourage all of us to lipsync even if some werent in frame in order for some students that are camera shy to still feel comfortable infront of a camera
- Gave me a genral outlook on what a screen test should look like 
- It was time efficient as it only took us 10 minutes as a class to record this screen test

Disadvantages: 
- Not all 20 students or so remembered the whole song which would cause them to not perform their best as they dont feel comfortable with the song their trying to lipsync to infront of the camera 
- Going through 20 students meant that not everyone got the same amount of screen time thus not allowing me to see everyones full potential in their performance 

Overall, this screen test allowed our class to take a break from project lessons letting ourselves let loose since it was quite fun doing. However I felt as though that no one really fits the image for my artist in this screen test meaning that me and my group will conduct our own screen test with the possible stars we already have in mind

---------------------------------------------------------------------------------------------------------------------------------------------------------------

๐‘บ๐’†๐’๐’‡ ๐‘น๐’†๐’‡๐’๐’†๐’„๐’•๐’Š๐’๐’:

This screen test allows us to know who to choose as our star. They must be able to act and lip-sync yo get professional results. However, no one from our class was our choice so we must find other students. We had a list of people who we considered to be our main star. I hope we can get a good casting to get an ultimate result. This was a fun activity and I had learned a lot from this.

Component 3: Song Research

 Here is a brief research on our chosen song, "The Weekend" by BIBI, 88rising, this research was conducted by Chelsea.


We did a very brief research on what the song was about and discussed it on our group chat.

This is the source: https://www.songtell.com/88rising-bibi/the-weekend#google_vignette 


Component 3: Lyric Sheet

Here is the lyric sheet for our music video project. Me and my teammates (Kalista, Chelsea, and Rara) all contributed on this as we discussed on our ideas for the narrative. This blog post is written by Chelsea.


After finalising our chosen song, our teacher helped us to print our song's lyric sheet, and we began by verballing discussing our thoughts and ideas as a group after each of us had proposed our own ideas and brainstormed which of the concepts we all agreed with. We all agree that, because of the upbeat rhythm of the song, we want our music video to feature both performance (dancing or lip-syncing) and a little bit of narrative elements as well. 


Below is the lyric paper sheet we've discussed during class: 


At the beginning we all have various perspectives and thoughts, which leads to some misunderstandings and uncertainty. Audrey and I imagined the music to be angsty in terms of mood, and the star will radiate the vibes of a stargirl (confident, bold, and unconcerned about what others say), dressed in bold colours like red and black and wearing heavy makeup. Meanwhile, my other teammates, Rara and Kalista, thought the entire music video would feature a sweet, vulnerable, innocent-looking star wearing white or light-colored clothes and light makeup, which contrasted my and my other teammates' ideas. 

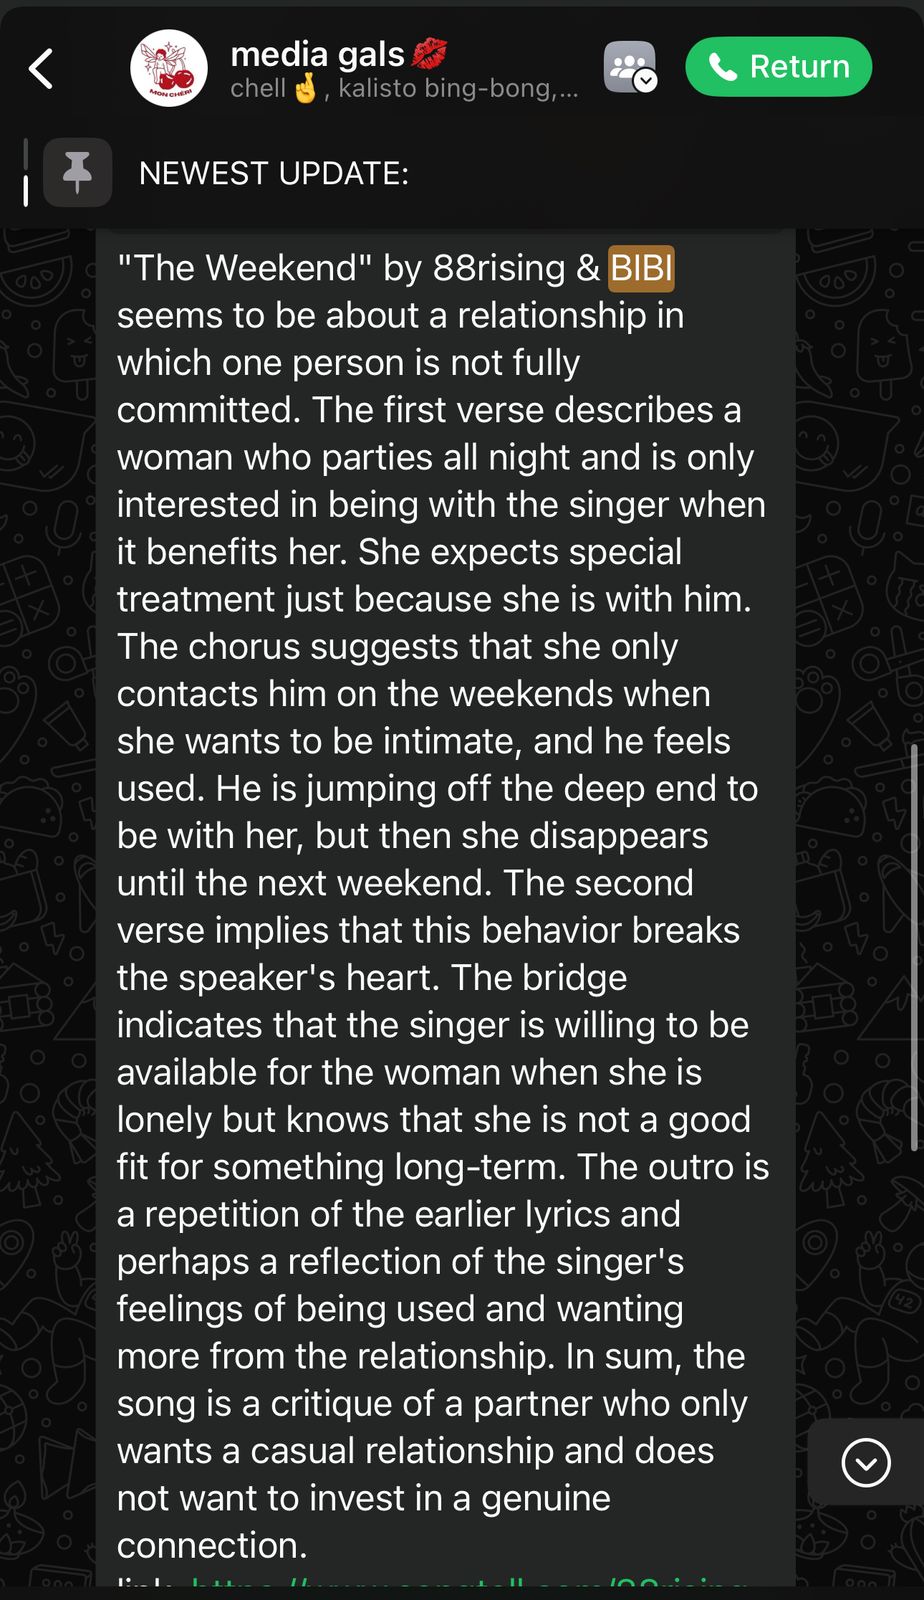
This idea clash took a long time to resolve, but we eventually came up with a satisfactory solution. To resolve this, we all went through the song's lyrics and original music video again, searching for the song's meaning (which will be explained further in the song research blogpost), and then we came up with an interesting idea. Given that the song revolves around a one-sided relationship in which the female star is being "played" (taken advantage of or manipulated) by the man, we want to add a twist to our music video. We decided that during the first half of the song, we would represent the star as innocent, fragile, and desperate for love (aligned with Kalista and Rara's idea). The second half of the song reveals that the main star is not as innocent as she appears, and that she is actually the "player" (aligned with Audrey and my idea). We also wanted to incorporate various connotations throughout the music video.

We were unable to annotate all parts of the lyrics on time since gathering thoughts that we all agreed on took up a significant amount of time in class. And, because meeting together face to face to work on this would be ineffective, we decided to change our lyric sheet discussion method by utilising digital media tools, which makes discussion more efficient, rather than one of us bringing the paper home and having to write all of the notes on their own. 


Below is the lyric paper sheet we transferred and gathered our ideas on Google Docs:


 Click here to access the link directly to the file for our music video lyric sheet.

We choose Google Docs to discuss and annotate our song lyrics because it is easier to highlight a part of a lyric and then adding comments to it. It is also more effective because it will not be a burden if the idea needs to be changed (which we have done several times); it is as simple as deleting and commenting on a new one, compared to doing it on paper, where you we must repeatedly erase and write a new one, which can be time consuming. It has also been easy for us to give comments and additional notes for a specific scene, especially if a member was absent while working and can be checked later, so not all members must be present at the same time but still collaborate together.


Selecting a part of the song lyric: 


Adding comments and additional notes:

Here we also utilised Google Meet to discuss our ideas together via online:


Unfortunately, embedding the Google Doc file to this blogpost does not let viewers to see the comments we've made. Hence, we tried to find another alternative solution for this problem. 

I began searching for whiteboard online applications that we could use and embed, and I came across one called Mural. I had no prior knowledge with this application, but I was able to figure it all out quickly because the user interface made it simple and guided me through the lyric sheet development process. So, I transferred all of the lyrics and annotations we made on the Google Doc, and my teammate Audrey helped me out with this. 

I used different coloured sticky notes to make it easier to differentiate between each part of the song (e.g., purple for verse, yellow for chorus). Aside from this feature, I discovered what makes this application stand out compared to Google Docs. Aside from the vibrant visuals we can use, I can also embed YouTube videos (since we got a loads of inspiration and references from other music videos and movies), so we can easily refer back to the inspiration simply by just watching the embedded video in the same window. 


Below is our final lyric sheet using the application, Mural


---------------------------------------------------------------------------------------------------------------------------------------------------------------

๐‘บ๐’†๐’๐’‡ ๐‘น๐’†๐’‡๐’๐’†๐’„๐’•๐’Š๐’๐’:

I was at first so stoked to get started on planning for our music video but I did not know how stressful it could be. There so many things to consider from the main plot and the technical elements. Not only that, we had to make sure all of the ideas would lead up to a certain meaning that the audience could interpret and make sure the technical elements conform and subvert to the generic conventions. We have to be really careful and precise when planning on lyric sheet because it's marked as the final narrative. Therefore, discussing with the group is really important to do. There are so many instances where our group cannot meet up physically which is why we conducted an online/virtual meeting along with texts in Whatsapp which is our main platform for communication. As a team, we need to be able to see eye-to-eye which is really time-consuming when discussing and setting a right and fixed narrative as we had to decided bar-to-bar and this task can't be divided and delegated. However, we got to finish it before submission and it was satisfactory.

Component 3: Storyboard

Here is the storyboard for my documentary project. Me and Chelsea created this storyboard (I did the first half whereas Chelsea did the last half). This blogpost is written by me (Audrey).

This story board acts as a visual guide for the chronology of the events. I apologize if the final results does not seem perfect.


Click here to access the link directly to the file for our storyboard.

---------------------------------------------------------------------------------------------------------------------------------------------------------------

๐‘บ๐’†๐’๐’‡ ๐‘น๐’†๐’‡๐’๐’†๐’„๐’•๐’Š๐’๐’:

I created a storyboard for a previous assignment in Media Studies previously, and we also had a class discussion about what parts are included in a storyboard. This information helped me because I understood what I needed to do (draw) and include in the storyboard, saving me time from researching storyboards from beginning. 
Problem (P): Personally, I struggled to manage my time while working on the storyboard. We had other parts of the project to work on (researches and plot), which prevented my focus and efforts from being directed toward the creation of our storyboard. I had other tasks to complete (such as research on pop music videos and their conventions), but I didn't have enough time to do so before moving on to the next portion of my blog/project process. Other schoolwork outside of Media Studies was also on the way, which prevented me from focusing only on Component 3.
Solution (S): We (me and Chelsea) were able to divide this task into two; I drew the first-half while Chelsea drew the other/last-half. This makes the job easier for us as we shared the responsibilities. At the end, I was able to finish my part of the storyboard even if it does not look professional. Either way, the use of storyboard is to guide us visually regarding to the plotline of the music video. This was enabled completely as our storyboard consist of all the elements and information needed for our production progress.
This storyboard acts as a visual guide for the chronology of the events. I apologize if the final results does not seem perfect (the document scan did not capture the drawings perfectly and could not be seen properly).

Component 3: Mood board

Here is the mood board for our music video project for our chosen song: "The Weekend" by BIBI, 88rising. This blogpost is written by me (Audrey).


Click here to access the link directly to the file for our mood board. 


---------------------------------------------------------------------------------------------------------------------------------------------------------------

๐‘บ๐’†๐’๐’‡ ๐‘น๐’†๐’‡๐’๐’†๐’„๐’•๐’Š๐’๐’:

Creating a mood board was very beneficial for us to find ideas on the theme and concept of our music video. It also helped us for visual aids which will guide us to the list of mise-en-scene needed for our music video. But most importantly, this mood board helped all four of us (Me, Rara, Chelsea, and Kalista) to have the same idea/concept for the whole music video. We all searched pictures of what had inspired us from Pinterest and made a collage to convey each and every one of our ideas. Then we are able to select and narrow it down one by one as we all decided on a theme. This allows us to be consistent on the aesthetics and concept of our music video to not loose any direction. We set our overall aesthetic to revolve around the femineity concept, teenage grunge/stargirl aesthetic, parties, and relationships. We agreed to follow the a certain style for the artist's outfits/wardrobe and makeup look and kept it consistent for the persona of the star and made sure all of our ideas are achievable and obtainable for production, especially on budget. I liked this process as it was quick and easy to do as we utilized Canva to make this. I enjoyed this and had fun creating the mood board with my teammates.